

I sent a whole day sawing Oak last Friday, the noise grinds you down a bit but the smell is fantastic! Sawing great lumps of Oak into 5mm thick slats creates a startling amount of sawdust, very expensive sawdust, still I can’t see another way round it. The beast of a saw at my father’s workshop has a very sharp new blade with a 3mm kerf which means to get 70mm of laminated beam I need around 125mm to start with.


The startling amount of sawdust settled on an equally startling amount of wine storage, (father has his priorities well sorted) which meant about an hour of sweeping and vacuuming at the end of the day.
The Oak started the day like this….

Once it was all sawn, this is what I was left with…

I hadn’t really thought through the amount of wastage so it will be back to the sawmill at some point to get some more. Meanwhile I’ve ordered some mild steel angle cut into 50mm lengths, from the The Metal Store, some bolts washers and wing nuts it’s time to make the jig!
time passes…..
Snow falls and 9 year old daughters must be appeased with snow man making.

He came out a little more martial then we were expecting with his teasel trident and ice shield. He lasted almost a week, looking more like a small white duck towards the end but still clinging on to ‘life’.
Eldest son, (usefully training to be an engineer) was cajoled into getting his hands dirty filing off burrs, and then the slightly warmer, inside by the fire, but rather tedious marking out. Now if I can just persuade son #2 and #3 to study Navigation and Sail Making we could have the makings of a pretty good team!

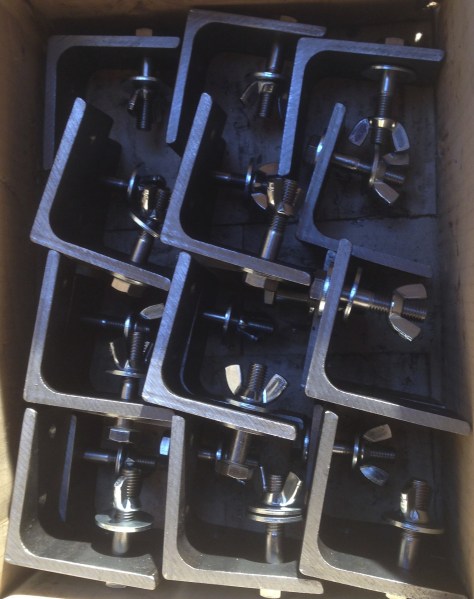
Back to the leaky workshop and before drilling 84 holes in 28 bits of steel angle, first get the trusty old drill working. After several years of neglect sitting under a leak in the roof, its more rusty than trusty and the belt shredded within moments. New belt from Lenco Motors, a squirt of oil, and the removal of some spacers to get the belt to fit, soon had it up and running.

Next job, make a jig…. yes I’m making a jig to make clamps for a jig… to make frames for the boat. It does seem a bit of a long winded process as my wife sweetly pointed out.

The conversation went something like this;
“What are these bits you’re making, dearest heart?”
“They’re clamps, my own sweet darling”
“Why, wherever do they go on the boat, you clever man?”
“Well my love, they don’t actually go on the boat…. they are more like tools… to make bits… that do go on the boat…”
“What?! You mean you’re spending all this time and money making things that aren’t even part of the boat?!” (thinks; “Dear lord what have I done to deserve this nincompoop?”)
Meanwhile, back in the cold and damp, a happy day is spent drilling, next stage, wooden pads.
Some leftover Walnut worktop seems a bit extravagant for clamps but its too small for any other use so…


The advantage of a bench disc sander is getting everything nice and square.

Next up, make the bed which might look something like this…

I’m sure this project is making very slow progress for anyone reading it, (don’t kid yourself man, there’s no one out there) but I’m starting to feel like things are moving forward. 🙂
